 Pin This
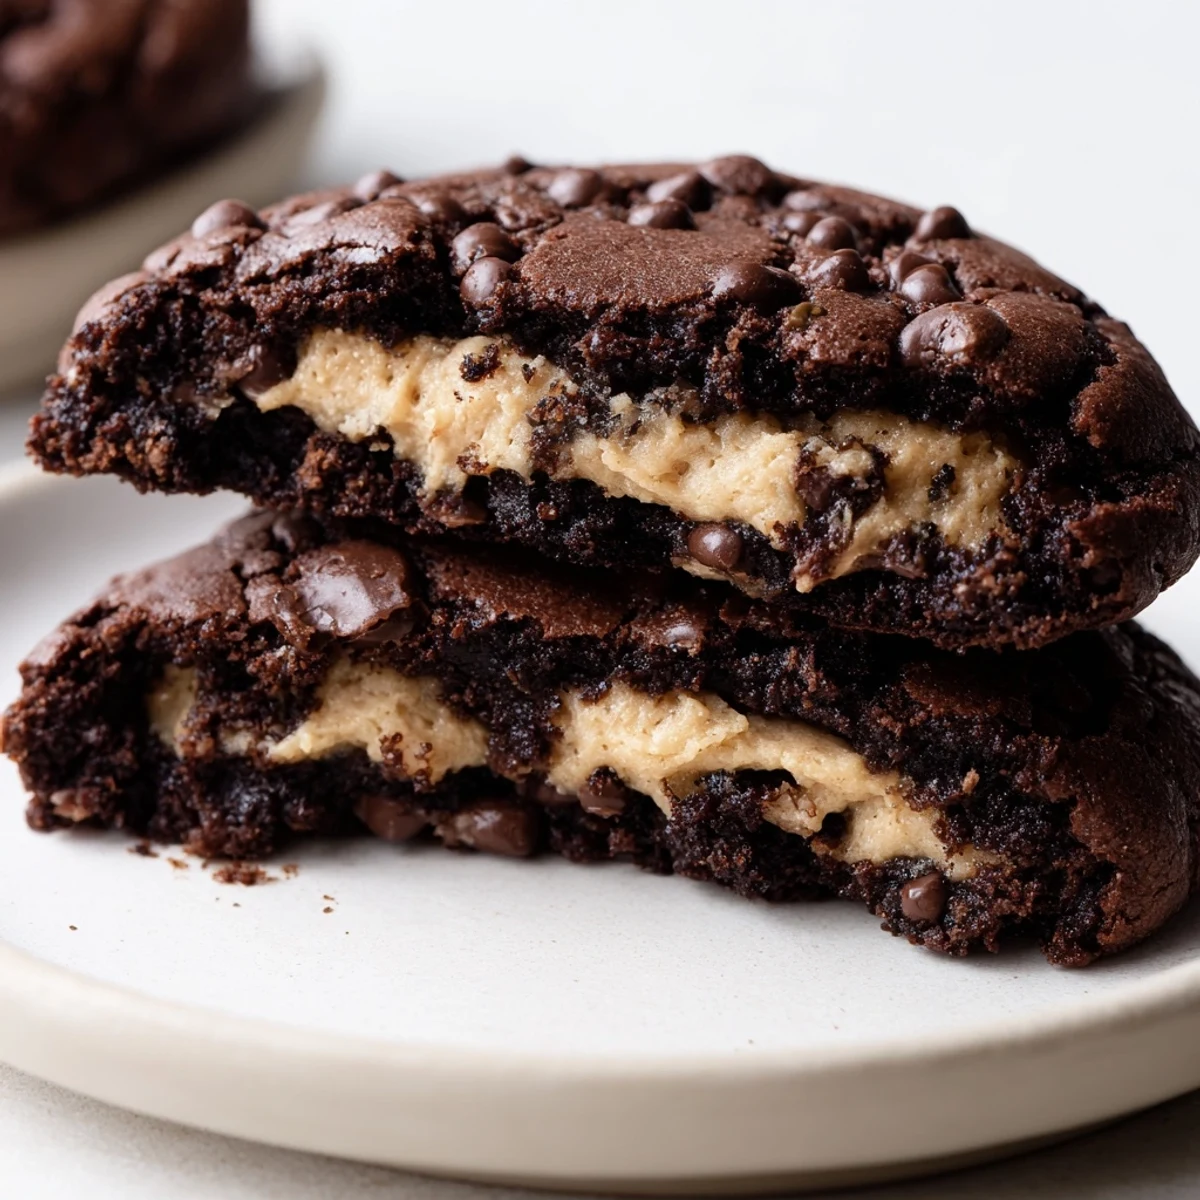
 These indulgent treats combine the best of both worlds—fudgy, crackly brownie cookies wrapped around a creamy, safe-to-eat cookie dough center. Each cookie features a crispy exterior, rich chocolate middle, and surprising creamy filling that creates an irresistible texture contrast.
The process involves making a simple eggless cookie dough filling first, then preparing a rich brownie batter with melted dark chocolate. After chilling, you'll wrap the brownie dough around the chilled centers and bake until just set with those signature crackly tops.
Perfect for chocolate enthusiasts, these cookies yield 12 large treats and can be stored for up to four days—though they rarely last that long!
My sister texted me at midnight last week, just two words: brownie cookies. I laughed, then somehow found myself melting chocolate at 1 AM because the idea took hold and wouldnt let go. The first batch came out too cakey, but by the third attempt, Id cracked the code. These became the reason my roommate now hovers near the oven every time I preheat it.
I brought a plate to my neighbors housewarming, and within ten minutes, three people asked for the recipe. Her dad took one bite, closed his eyes, and said this reminded him of the bakery his family visited every Sunday growing up. Thats the moment I knew this recipe wasnt just another chocolate dessert—it was the kind of treat that creates memories.
Ingredients
- Unsalted butter: I use slightly softened butter for the filling because it creams into tiny air pockets that make the dough lighter. For the brownie portion, melting it with the dark chocolate creates that intense fudgy texture.
- Dark chocolate (70%): Higher cocoa percentage balances the sweet cookie dough center. Ive tried semisweet, but the cookies lose that sophisticated edge that makes adults reach for seconds.
- Heat-treated flour: This is non-negotiable for the filling since it will be sandwiched between baked layers. I microwave mine in 30-second bursts, stirring thoroughly until it reaches 165°F throughout.
- Mini chocolate chips: Regular chips create awkward pockets in the small dough balls. Minis distribute evenly so every bite has consistent chocolate pockets instead of occasional overwhelming chunks.
Instructions
- Make the cookie dough filling first:
- Cream the softened butter and brown sugar until the mixture looks pale and fluffy, about 2 minutes. Whisk in the milk and vanilla, then fold in the heat-treated flour and salt until no dry streaks remain. Gently incorporate the mini chocolate chips, then scoop 12 small balls and chill them on a parchment-lined plate while you make the brownie dough.
- Melt the chocolate base:
- Combine the butter and chopped dark chocolate in a heatproof bowl, then melt in 30-second microwave bursts, stirring between each interval. The mixture should be glossy and completely smooth, with no small chocolate pieces remaining. Let it cool for about 10 minutes so it doesnt cook the eggs when you combine them.
- Whip the sugars and eggs:
- Beat the granulated sugar, brown sugar, and eggs on medium-high speed for exactly 2 minutes until the mixture turns pale and slightly thickened. Stir in the vanilla, then pour in the melted chocolate mixture and fold until fully incorporated.
- Combine and chill:
- Whisk together the flour, cocoa powder, baking powder, and salt in a separate bowl. Add these dry ingredients to the chocolate mixture and mix until a thick, fudgy dough forms. Refrigerate for 15 minutes because this dough is incredibly soft and needs firmness to handle.
- Wrap and seal:
- Preheat your oven to 350°F and line two baking sheets with parchment. Scoop about 2 tablespoons of brownie dough, flatten it in your palm like a disc, then place one chilled cookie dough ball in the center. Gently fold the brownie dough around the filling, pinching seams to completely encase the cookie dough center.
- Bake until just set:
- Space the cookies at least 2 inches apart on the prepared trays. Bake for 10 to 12 minutes until the tops develop those signature crackles and look slightly set but still soft in the center. Let them cool on the baking sheet for 10 minutes because they need this time to finish cooking internally and set their structure.
 Pin This
 My usually reserved chemistry professor tried one during office hours and immediately asked if I could make two dozen for his anniversary. There is something universally comforting about biting through a crackly chocolate exterior and finding that surprise creamy center, like discovering a secret someone hid just for you.
Getting the Centers Right
The cookie dough balls must be thoroughly chilled before wrapping, or they will melt into the brownie dough while baking. I learned this the hard way when I got impatient and ended up with cookies that had no distinct filling—still delicious, but missing the whole point. Pop the filling balls in the freezer for 10 minutes if your kitchen runs warm.
Pan Selection Matters
Light-colored baking sheets give you the best results because dark pans absorb more heat and can overcook the bottoms before the tops set properly. I use rimmed baking sheets lined with parchment, which makes cleanup effortless and prevents any sticking issues that might tear the delicate cookie bottoms.
Storage and Timing Tips
These cookies actually improve after sitting overnight because the flavors meld and the texture becomes even more fudgy. If you can resist eating them warm, store them in an airtight container and wait until the next day. The cookie dough center softens slightly and integrates beautifully with the brownie exterior.
- Freeze unbaked wrapped cookies on a tray, then transfer to a bag for fresh-baked treats anytime.
- Warm a stored cookie for 15 seconds in the microwave to recreate that just-baked experience.
- The filling balls can be made up to three days ahead and kept refrigerated until you are ready to bake.
 Pin This
 There is nothing quite like watching someones face when they bite into what looks like a regular brownie cookie and discover that hidden center. These are the cookies that make people remember you, the ones they will ask for by name years later.
Recipe FAQs
- → What makes these different from regular brownies?
-
These feature a unique stuffed center with eggless cookie dough, creating a surprise creamy filling inside the fudgy brownie exterior. The texture contrast between the crisp edges, soft brownie middle, and creamy dough center sets them apart from traditional brownies.
- → Is the cookie dough center safe to eat?
-
Yes! The filling uses eggless dough with heat-treated flour. Simply microwave the flour for 60 seconds, stirring halfway, to ensure it's safe for raw consumption. This eliminates any bacterial concerns while maintaining that classic cookie dough flavor.
- → Can I make the dough ahead of time?
-
Absolutely! Both the cookie dough filling and brownie dough can be prepared up to 24 hours in advance. Keep the cookie dough balls refrigerated until ready to assemble. The brownie dough may need to sit at room temperature briefly before scooping if it becomes too firm.
- → Why is my brownie dough too thick or thin?
-
Temperature affects consistency significantly. If the dough is too warm, it will be loose and sticky. If too cold, it becomes hard to work with. Chill for 10-15 minutes for ideal handling texture. The dough should feel thick and scoopable, not pourable.
- → Can I use different chocolate types?
-
Dark chocolate around 70% creates the richest flavor, but semi-sweet works well for a milder taste. Milk chocolate makes them sweeter but may affect the fudgy texture. For best results, use baking chocolate bars chopped into pieces rather than chocolate chips.
- → How do I know when they're done baking?
-
The cookies are ready when tops are just set with crackles and edges look slightly firm. They should still appear slightly underdone in the center—they continue cooking on the hot tray. Overbaking will result in cakey rather than fudgy cookies.
